Your iPhone camera can serve as a powerful webcam for your Mac, enhancing your video calls with superior image quality. Using Apple’s Continuity Camera feature, you can wirelessly connect your iPhone to your Mac or use a USB cable for a wired connection. This functionality is especially useful for professionals, content creators, or anyone needing better video quality than their Mac’s built-in camera provides.
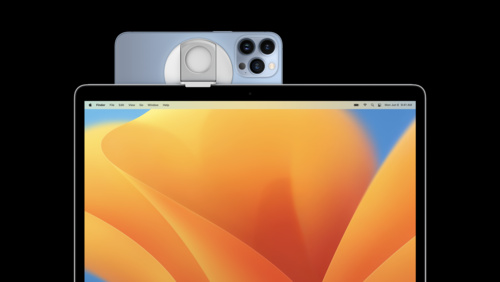
Setting up this connection is simple and opens up access to additional video effects. You can mount your iPhone above your Mac display with accessories like the Belkin iPhone Mount with MagSafe. Once connected, you’ll be able to use your iPhone’s advanced camera system for video calls, content creation, or professional presentations.
Beyond webcam functionality, you can also use this connection to transfer photos from your iPhone to your Mac. The Photos app on your Mac allows you to import images directly from your connected iPhone, making it easy to manage and edit your photo collection.
Connect iPhone Camera to Mac
Connecting your iPhone camera to your Mac can be useful for video calls, live streaming, or recording high-quality video directly from your Mac. There are multiple ways to do this, depending on your needs.
Method 1: Use Continuity Camera (macOS Ventura or Later)
Apple’s Continuity Camera allows you to use your iPhone as a webcam for FaceTime, Zoom, or any video conferencing app.
Requirements:
- iPhone XR or later running iOS 16 or later
- Mac running macOS Ventura or later
- Wi-Fi and Bluetooth enabled on both devices
- Both devices signed into the same Apple ID with Handoff enabled
Steps:
- Mount Your iPhone – Position it on a stand or tripod with the rear camera facing you.
- Enable Continuity Camera:
- On your iPhone, go to Settings > General > AirPlay & Handoff > Continuity Camera and toggle it ON.
- Select iPhone as Your Camera on Mac:
- Open FaceTime, Zoom, Google Meet, or any video app.
- In the app’s settings, select iPhone Camera as the input.
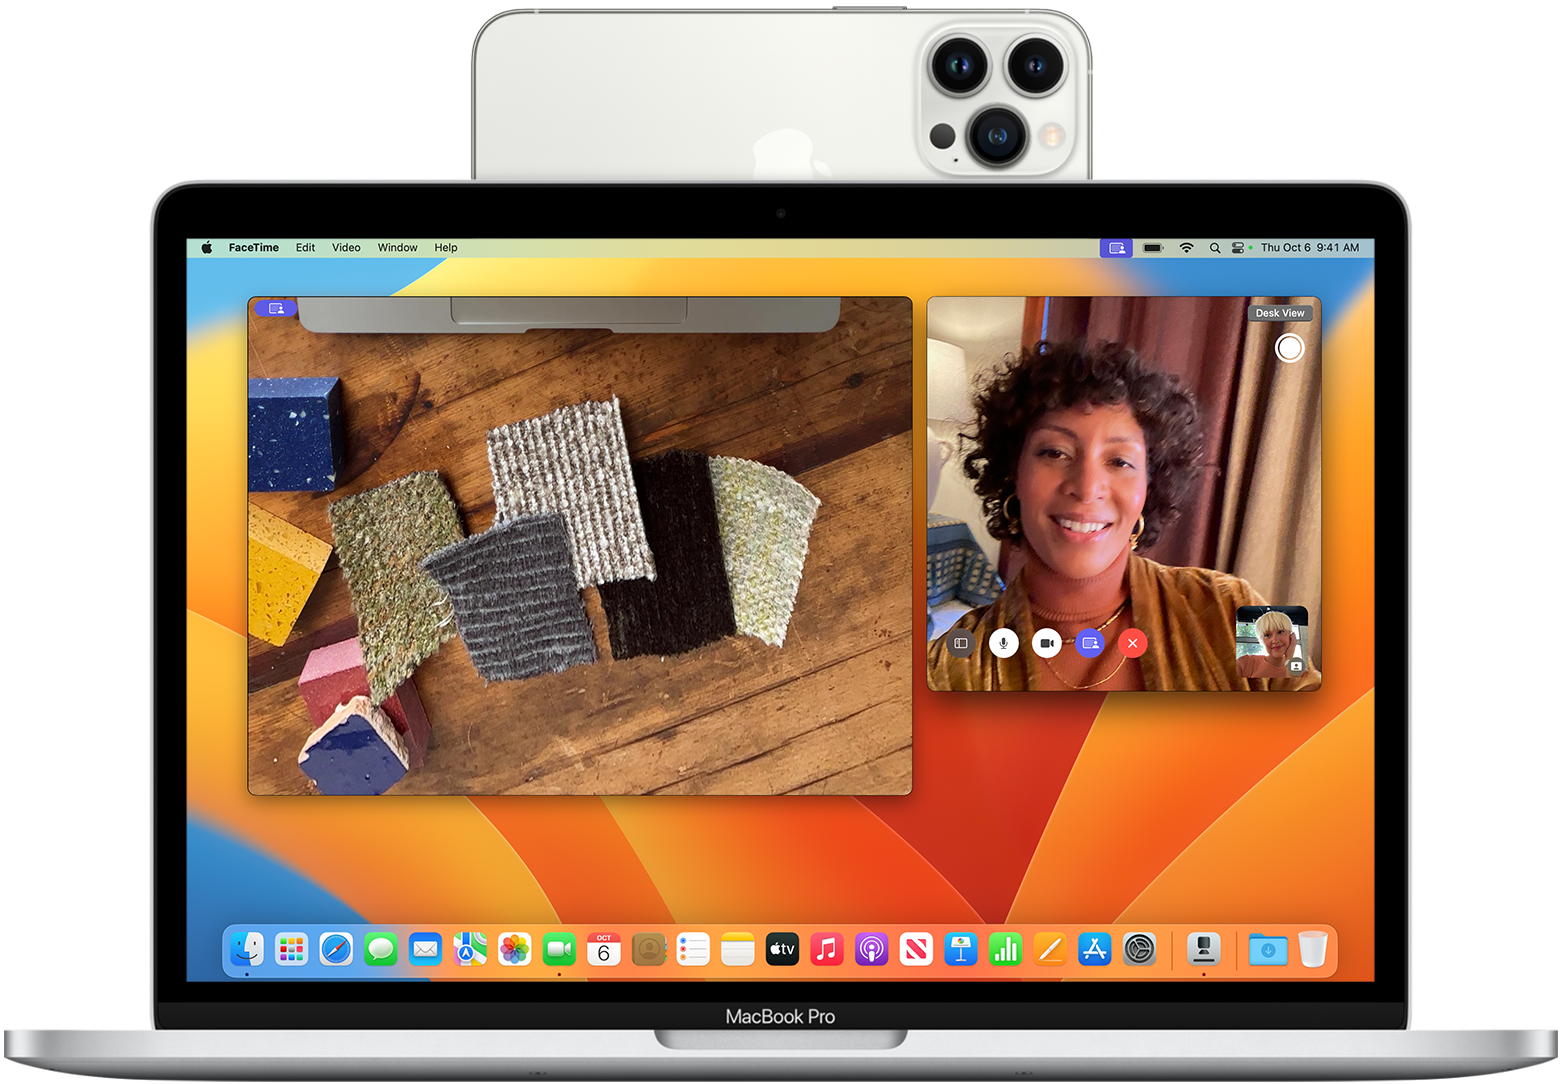
- Use Center Stage, Portrait Mode, or Studio Light (Optional)
- Some apps allow extra features like Desk View and Center Stage (keeps you in the frame).
Method 2: Connect via QuickTime (Wired)
If you want to record video directly from your iPhone to your Mac:
Steps:
- Connect your iPhone to your Mac using a Lightning-to-USB or USB-C cable.
- Open QuickTime Player on your Mac.
- Click File > New Movie Recording.
- Click the arrow next to the record button and select your iPhone under Camera.
- Your iPhone’s camera feed will now appear on your Mac.
- Click Record to start capturing video.
Method 3: Use Third-Party Apps (For Streaming & Recording)
If you need more control over video settings or want to use your iPhone as a webcam for live streaming, third-party apps provide more flexibility.
Popular Apps:
- Camo by Reincubate – Turns your iPhone into a professional webcam with high-quality settings.
- EpocCam by Elgato – Wireless webcam solution with good integration for streaming.
- iVCam – Works similarly to EpocCam and supports Windows as well.
How to Use:
- Install the app on both your iPhone and Mac.
- Connect via Wi-Fi or USB.
- Select your iPhone as the webcam source in Zoom, OBS, or FaceTime.
Method 4: Use AirPlay for Wireless Streaming
If you just want to mirror your iPhone camera to your Mac:
Steps:
- Enable AirPlay on Mac – Go to System Settings > General > AirPlay & Handoff and turn on AirPlay Receiver.
- Open Control Center on iPhone – Swipe down from the top right.
- Tap Screen Mirroring and select your Mac.
- Open QuickTime and select New Movie Recording to display the mirrored screen.
Overall
- For video calls: Use Continuity Camera (best quality and easiest setup).
- For recording video: Use QuickTime (wired connection).
- For advanced features: Use third-party apps like Camo or EpocCam.
- For screen mirroring: Use AirPlay.
Key Takeaways
- iPhone can connect to Mac wirelessly or via USB cable to function as a high-quality webcam using Continuity Camera.
- A mounting accessory helps position your iPhone properly above your Mac display for optimal camera angles.
- The connection also enables direct photo transfers from iPhone to Mac through the Photos app.
Understanding the Basics
Connecting an iPhone camera to a Mac opens up new possibilities for video conferencing, content creation, and photo management. This integration leverages Apple’s ecosystem to provide seamless connectivity and enhanced functionality.
Compatibility and System Requirements
The most direct way to use an iPhone as a webcam for a Mac is through Apple’s Continuity Camera feature. This feature requires macOS Ventura or later on the Mac side and iOS 16 or later on the iPhone. Both devices must be signed in to the same Apple ID with two-factor authentication enabled.
For older systems, third-party solutions can bridge the gap. Mac computers running macOS Mojave can still connect to iPhones, though with fewer features. The connection methods include wireless options (requiring both devices to be on the same Wi-Fi network) and wired connections using a Lightning or USB-C cable.
Bluetooth must be enabled on both devices for proper detection. The iPhone models that work best with these features include iPhone XR and newer, with iPhone 12 or later providing access to Center Stage and other advanced camera features.
Advantages of iPhone Camera Integration
Using an iPhone camera with a Mac delivers significant improvements over the built-in webcam. iPhones offer superior video quality with higher resolution sensors and better low-light performance, instantly upgrading video call quality.
The Ultra Wide camera on newer iPhone models enables Center Stage, which automatically keeps you in frame during video calls. This feature is particularly useful for presenters who move around while speaking.
iPhone cameras also provide specialized modes like Studio Light, which adds professional-looking illumination to your face during calls. Portrait mode can blur your background without needing a green screen or dedicated software.
The setup requires no additional hardware purchases for Apple users who already own both devices. This integration saves money compared to buying a dedicated high-quality webcam or camera equipment.
Setting Up Your iPhone Camera with Mac
Connecting your iPhone camera to a Mac offers versatile options for video calls, content creation, and photo transfers. Apple’s Continuity Camera feature turns any iPhone into a powerful webcam for Mac, providing superior video quality compared to built-in webcams.
Connecting via Wi-Fi or Bluetooth
To connect an iPhone camera to Mac wirelessly, both devices must be on the same Wi-Fi network and have Bluetooth enabled. Users should ensure their iPhone runs iOS 16 or later and their Mac runs macOS Ventura or newer.
Begin by opening Control Center on the iPhone by swiping down from the top-right corner. Check that both Wi-Fi and Bluetooth are active with blue icons.
On the Mac, open the video conferencing app or software that requires camera input. From the app’s settings, select the camera input source and choose the iPhone from the available options.
The connection range extends to about 30 feet with Bluetooth, though maintaining closer proximity ensures better video quality and reduces lag. When properly connected, the iPhone screen will display a camera icon to indicate it’s functioning as a webcam.
Using a USB Cable for Connection
For the most reliable connection, a physical USB cable provides consistent performance and charges the iPhone simultaneously. This method works well when Wi-Fi is unstable or unavailable.
Connect the iPhone to the Mac using the appropriate cable:
- Lightning to USB-C for newer Macs
- Lightning to USB-A for older Mac models
- USB-C to USB-C for iPhone 15 and newer
Once connected, unlock the iPhone and tap “Trust This Computer” if prompted. The Mac should automatically recognize the iPhone as an available camera option.
In video apps like FaceTime, Zoom, or Teams, access settings and select the iPhone from the camera dropdown menu. Users can switch between the iPhone’s front and rear cameras for different shooting angles and quality options.
Ensuring Apple ID and Handoff Configuration
Both devices must be signed into the same Apple ID for Continuity Camera to function properly. This shared identity enables the Mac to recognize and communicate with the iPhone seamlessly.
Check Apple ID configuration by going to System Settings on Mac and Settings > Apple ID on iPhone. Verify that both devices display the same account information.
Enable Handoff features on both devices:
- On iPhone: Settings > General > AirPlay & Continuity > Handoff
- On Mac: System Settings > General > AirDrop & Handoff
Two-factor authentication should be active on the Apple ID for security and proper functionality. If experiencing connection issues, signing out and back into the Apple ID on both devices often resolves problems.
Remember to keep both devices updated to the latest software versions, as Apple frequently improves Continuity Camera functionality through updates.
Software Setup
Setting up the connection between an iPhone camera and Mac requires the right software configuration. Modern Macs offer built-in solutions while several third-party applications provide additional functionality for those needing more features.
Utilizing the Continuity Camera Feature
Continuity Camera is Apple’s native solution for using an iPhone as a webcam on Mac. This feature requires macOS Ventura or later on the Mac and iOS 16 or newer on an iPhone 8/XR or later. Both devices must be signed into the same Apple ID.
To use Continuity Camera:
- Ensure both devices have Bluetooth and Wi-Fi turned on
- Open a video app on Mac (FaceTime, Zoom, etc.)
- Click the video menu in the app
- Select your iPhone as the camera source
When properly set up, the iPhone automatically activates when selected. Continuity Camera supports advanced features like Center Stage, Portrait mode, and Studio Light. For more reliability, users can connect via USB cable for a wired connection.
No additional downloads are needed as this functionality comes built into macOS and iOS.
Using Third-Party Webcam Apps
If Continuity Camera doesn’t meet your needs or you’re using an older device that doesn’t support it, third-party apps offer excellent alternatives.
EpocCam is a popular option that works with both Mac and Windows computers. After installing the app on your iPhone and the companion driver on your Mac, EpocCam allows wireless connection through the same Wi-Fi network.
Other reliable third-party options include:
- Camo: Offers high-quality video with advanced settings
- iVCam: Provides multiple resolution options and special effects
- DroidCam: Works with both iOS and Android devices
These applications typically offer free versions with basic functionality and premium versions with additional features like higher resolution, removing watermarks, and special effects.
For best performance with any third-party webcam app, ensure both devices connect to the same Wi-Fi network and keep software updated on both your Mac and iPhone.
Mounting and Positioning
Properly mounting and positioning your iPhone camera when connected to a Mac ensures stable video quality and comfortable usage during calls or recordings. The right setup makes a significant difference in your video conferencing experience.
Choosing the Right iPhone Mount
Several mount options are available for connecting your iPhone camera to your Mac. The Belkin iPhone Mount with MagSafe is a popular choice that costs around $29.95 and works well with Mac notebooks. This mount uses MagSafe technology to securely attach your iPhone to your MacBook.
For desktop Mac users, dedicated stands that position the iPhone at eye level provide better viewing angles. Look for mounts with adjustable arms that let you position your iPhone horizontally or vertically depending on your needs.
When selecting a mount, consider:
- Compatibility with your specific iPhone model
- Stability to prevent camera shake
- Ease of attachment/detachment for quick setup
Mounts that support both landscape and portrait orientations offer more flexibility, especially when using features like Desk View that benefit from specific positioning.
Adjusting for Optimal Viewing Angles
Once mounted, proper positioning of your iPhone camera is crucial for professional-looking video. Position the iPhone camera at eye level to avoid unflattering angles or the appearance of looking down at your audience.
For standard video calls, center yourself in the frame with your face taking up approximately one-third of the screen. Natural light works best when positioned in front of you rather than behind, which creates silhouettes.
When using Continuity Camera’s specialized features like Center Stage or Portrait mode, proper positioning becomes even more important. Center Stage works best when the iPhone has enough space to track your movements.
For Desk View feature, position your iPhone so the camera can capture both your face and desk area below. This typically requires mounting your iPhone slightly higher and angled downward to include both areas in frame.
Using iPhone Camera for Video Calls and Conferencing
Using an iPhone camera as a webcam for Mac enhances video call quality with superior camera features and flexibility compared to built-in webcams. This setup works with popular conferencing platforms and offers special effects to improve your appearance on calls.
Integrating with Video Call Applications
iPhone webcams integrate seamlessly with most major video conferencing applications on Mac. Users can select their iPhone camera as the video source in Zoom, Microsoft Teams, Google Meet, and Skype by adjusting video settings within these applications.
To set this up in Zoom, users should open preferences, select the “Video” tab, and choose iPhone from the camera dropdown menu. For Microsoft Teams, navigate to Settings and select the iPhone under camera options.
Most apps automatically detect the iPhone when properly connected through Continuity Camera or via USB. If a connected iPhone isn’t appearing, users can try disconnecting and reconnecting or restarting both devices.
FaceTime naturally works with this setup, allowing for high-quality video calls directly between Apple devices.
Applying Video Effects and Features
The iPhone camera offers several advanced video effects that enhance conferencing experiences. Center Stage uses the ultra-wide lens to keep users centered in the frame even when moving around, perfect for presentations or dynamic meetings.
Portrait mode blurs the background automatically, providing a professional look without a green screen. Studio Light adds gentle illumination to the face, reducing shadows in poorly lit environments.
Users can access these effects by clicking the Control Center icon in the Mac menu bar during a video call. A dropdown menu appears with available video effects that can be toggled on or off.
Desk View is another unique feature that simultaneously shows the user’s face and an overhead view of their desk, ideal for demonstrations or showing physical items during meetings.
Lighting conditions significantly impact camera quality. Even with Studio Light enabled, setting up in a well-lit area facing a window produces the best results.
Advanced Functions and Productivity
Connecting your iPhone camera to your Mac unlocks powerful features that enhance both professional workflows and creative projects. These advanced capabilities transform how users capture, share, and utilize visual content across Apple devices.
Exploiting Desk View for Enhanced Workflows
Desk View is one of Continuity Camera’s most innovative features. It uses the iPhone’s ultra-wide camera to simultaneously show the user’s face and desk area without requiring additional hardware.
This feature is particularly valuable during presentations and remote teaching sessions. Users can demonstrate physical objects or handwritten notes while maintaining eye contact with their audience.
To activate Desk View:
- Connect iPhone as a webcam using Continuity Camera
- Open Control Center on Mac
- Select Video Effects
- Choose Desk View option
Desk View works seamlessly with apps like Keynote, Zoom, and Microsoft Teams. Professionals can switch between standard view and Desk View during meetings without interrupting their workflow.
The feature also supports high-quality video recording, making it perfect for creating tutorials or demonstration videos for projects that require showing physical manipulation of objects.
AirPlay and Photo Transfer Options
AirPlay provides a wireless solution for streaming iPhone camera content directly to a Mac. This approach offers flexibility when physical connections aren’t feasible or when users need to quickly share visual content.
To use AirPlay for camera streaming:
- Ensure both devices are on the same Wi-Fi network
- Open Control Center on iPhone
- Tap Screen Mirroring
- Select your Mac from the options
For transferring photos and videos after capturing them, users have multiple efficient options. AirDrop allows for immediate wireless transfer of selected images or videos between devices without compromising quality.
The Photos app provides another seamless method. Connect iPhone to Mac via USB cable, open Photos app, and import selected content directly. This method works well for transferring large batches of photos and videos.
For automated transfer, enable iCloud Photos on both devices. New photos captured on iPhone will automatically sync to Mac without manual intervention, ensuring content is always available across devices.


