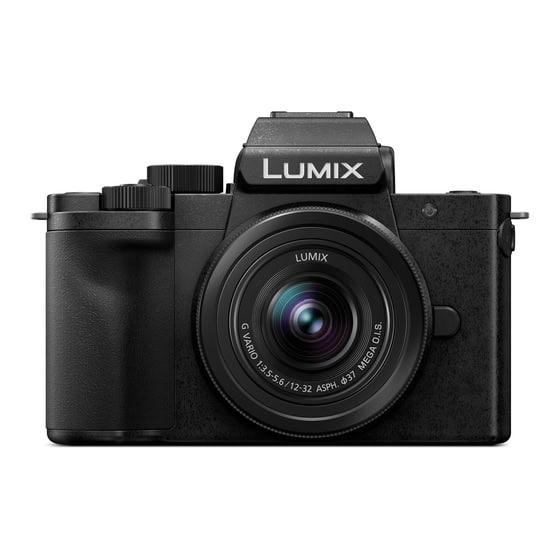
The Panasonic Lumix DC-G100 is a versatile digital camera designed for content creators and vloggers. Like any electronic device, it may face occasional issues. Common problems with the G100 can often be solved through basic troubleshooting steps, such as checking the battery, updating firmware, or adjusting settings.
If you’re experiencing difficulties with your Lumix G100, don’t worry. Many issues have simple fixes you can try at home. The official Panasonic support page offers helpful resources, including the owner’s manual and troubleshooting guides.
Here’s a quick reference table for common G100 issues and their potential solutions:
Issue | Possible Solution |
---|---|
Camera won’t turn on | Check battery charge |
Blurry images | Clean lens, adjust focus |
Memory card errors | Format card, check compatibility |
Firmware problems | Update to latest version |
Audio issues | Check microphone settings |
Troubleshooting Your Panasonic Lumix G100
The Panasonic Lumix G100 is a great camera for vloggers and photographers. But like any technology, you may run into some issues. This guide will help you troubleshoot common problems.
Camera Won’t Turn On
- Check the Battery: Make sure the battery is properly inserted and charged. Try a different battery if you have one.
- Check the Power Switch: Ensure the power switch is in the “On” position.
- Memory Card Issue: In rare cases, a faulty memory card can prevent the camera from turning on. Try removing the memory card and turning the camera on again.
Blurry Photos
- Check the Focus: Make sure the camera is focusing correctly. Try using single-point autofocus and select the desired focus point.
- Use a Faster Shutter Speed: A faster shutter speed helps freeze motion and prevent blur. Increase the shutter speed, especially in low light or when photographing moving subjects.
- Stabilization: Ensure image stabilization is turned on. This helps reduce camera shake.
- Clean the Lens: A dirty lens can cause blurry images. Clean the lens with a microfiber cloth.
Video Recording Issues
- Check Memory Card Capacity: Ensure your memory card has enough free space.
- Format the Memory Card: Try formatting the memory card in the camera.
- Check Recording Settings: Make sure the video recording settings are correct. Check the resolution, frame rate, and recording limit.
Connectivity Problems
- Wi-Fi Connection: Make sure Wi-Fi is enabled on the camera and your phone. Check your phone’s Wi-Fi settings and ensure it’s connected to the camera’s network.
- Bluetooth Connection: Ensure Bluetooth is enabled on both the camera and your phone. Try restarting both devices.
- App Issues: Make sure you have the latest version of the Panasonic Image App installed on your phone.
Overheating
- Avoid Prolonged Recording: Extended video recording can cause the camera to overheat. Take breaks during recording sessions.
- Ventilation: Ensure the camera has proper ventilation. Avoid blocking the vents.
- Ambient Temperature: High ambient temperatures can contribute to overheating. Try to use the camera in cooler environments.
Other Issues
- Reset the Camera: Try resetting the camera to its default settings.
- Firmware Update: Make sure your camera has the latest firmware installed.
- Contact Support: If you’re still experiencing problems, contact Panasonic support for assistance.
Issue | Possible Solutions |
---|---|
Camera Won’t Turn On | Check battery, check power switch, try a different battery, remove memory card |
Blurry Photos | Check focus, use a faster shutter speed, ensure image stabilization is on, clean the lens |
Video Issues | Check memory card capacity, format the memory card, check recording settings |
Connectivity Problems | Check Wi-Fi settings on camera and phone, check Bluetooth settings on camera and phone, restart devices, ensure the latest version of the Panasonic Image App is installed |
Overheating | Avoid prolonged recording, ensure proper ventilation, use the camera in cooler environments |
Other Issues | Reset the camera to default settings, update camera firmware, contact Panasonic support |
Keeping Your Lumix G100 in Top Shape
To prevent issues and keep your Lumix G100 working smoothly, remember these tips:
- Clean the lens and sensor regularly.
- Format memory cards before each use.
- Store the camera in a safe place when not in use.
- Update the firmware when new versions are available.
- Handle the camera with care to avoid damage.
- Use the correct accessories and batteries.
- If you experience any problems, consult the user manual or contact Panasonic support.
Setting Up Your Lumix G100
Preparing your Lumix G100 for use involves a few key steps. Follow these instructions to get your camera ready for shooting.
Charge and Insert the Battery Pack
Start by charging the battery pack fully. Connect the AC adaptor to the battery charger and plug it into a power outlet. Place the battery in the charger. The charging light will turn on and go off when charging is complete.
To insert the battery:
- Open the battery door on the camera’s bottom.
- Insert the battery with the Panasonic logo facing up.
- Push until you hear a click.
- Close the battery door securely.
Make sure to use only genuine Panasonic batteries for your G100. The battery life indicator will show on the camera’s screen when powered on.
Install the Memory Cards
The G100 supports SD, SDHC, and SDXC memory cards. For best performance, use UHS Speed Class 3 or higher cards.
To insert a memory card:
- Open the card slot cover on the side.
- Push the card in until it clicks.
- Close the cover.
Always format new cards in the camera before use. Go to Menu > Setup > Format to do this.
Attach the Lens
Your G100 likely came with a kit lens. To attach it:
- Remove the body cap from the camera.
- Align the lens mount marks on the camera and lens.
- Turn the lens clockwise until it clicks.
Remember to remove the lens cap before shooting. To detach the lens, press the lens release button and turn counterclockwise.
Adjust the Initial Camera Settings
When you first turn on your G100, you’ll need to set up some basics:
- Language: Choose your preferred language.
- Date/Time: Set the current date and time.
- Time Zone: Select your location’s time zone.
Access these settings through Menu > Setup. You can also customize buttons and adjust other preferences to suit your shooting style.
Setting | Options | Recommendation |
---|---|---|
Image Quality | RAW, JPEG, RAW+JPEG | RAW+JPEG for flexibility |
Focus Mode | AFS, AFF, AFC, MF | AFS for beginners |
Metering Mode | Multiple, Center Weighted, Spot | Multiple for general use |
Check for firmware updates regularly to ensure your G100 has the latest features and improvements.
Connectivity Issues
Connectivity problems can hinder the Lumix G100’s performance. Wi-Fi and Bluetooth issues are common but often have simple solutions.
Wi-Fi Setup and Connection
Wi-Fi connection issues may occur due to several factors. Check your camera’s battery level. A flashing red indicator can prevent connections. Move away from metal surfaces, which may interfere with signals.
Verify your network settings. Ensure you’re connecting to the correct network. Double-check the password entry. Some routers use case-sensitive passwords.
Reset the camera’s Wi-Fi settings if problems persist. Go to the menu and select:
- Setup
- Reset
- Reset Wi-Fi Settings
This clears saved networks and passwords. You’ll need to reconnect afterward.
Bluetooth Function Troubleshooting
Bluetooth connectivity enhances the G100’s functionality. If you’re having trouble, try these steps:
- Update your camera’s firmware
- Restart both the camera and your device
- Clear paired devices and re-pair
Check compatibility with your smartphone or tablet. Not all devices work seamlessly.
Enable location services on your device. Some functions require this for proper operation.
If issues continue, try using the Panasonic Image App. It often provides a more stable connection than native device functions.
Remember to keep your camera and device close during pairing and operation. Bluetooth has limited range.
Connectivity Feature | Common Issues | Quick Fix |
---|---|---|
Wi-Fi | Signal interference | Move away from metal objects |
Bluetooth | Pairing failure | Clear and re-pair devices |
Remote Control | App disconnects | Update camera firmware |
Imaging and Recording Problems
The Lumix G100 can experience issues with video recording, photography, and image stabilization. These problems may affect your content quality and shooting experience.
Video Recording Anomalies
When using the Lumix G100 for video, you might encounter unexpected recording stops. This can happen if the camera overheats or the memory card is too slow. To prevent this, use a high-speed SD card rated for 4K video.
The 4K recording mode may also cause issues. If your footage looks choppy or drops frames, check your recording settings. Ensure you’re using a compatible frame rate and bitrate for your memory card’s speed.
White balance problems can affect video color accuracy. If your footage has an unnatural tint, adjust the white balance manually or use a custom setting.
Photography Issues: Focus and Exposure
Focus problems are common in photography. If your images are consistently blurry, check your autofocus settings. The G100’s Intelligent Auto Mode usually works well, but manual focus may be necessary in low light.
Exposure issues can result in over or underexposed photos. Use the camera’s histogram to check exposure. Adjust ISO sensitivity or use exposure compensation to correct brightness problems.
For challenging scenes, try bracketing your shots. This technique takes multiple photos at different exposures, ensuring you capture the best image.
Troubleshooting Image Stabilizer and Flash
The G100’s image stabilizer can malfunction, causing shaky images. If this occurs, turn the stabilizer off and on again. If the problem persists, a firmware update may help.
Flash issues often stem from incorrect settings. Ensure your flash is set to the appropriate mode for your scene. For indoor shots, try slow sync flash to balance ambient light with the flash.
If the built-in flash isn’t firing, check that it’s not obstructed and the battery has sufficient charge. External flashes may need their contacts cleaned for proper function.
Problem | Possible Solution |
---|---|
Video stops unexpectedly | Use faster SD card |
Blurry photos | Check autofocus settings |
Over/underexposed images | Use histogram, adjust exposure |
Image stabilizer not working | Restart or update firmware |
Flash not firing | Check obstruction and battery |
General Camera Maintenance
Proper care of your Lumix G100 ensures optimal performance and longevity. Regular updates and careful handling of accessories are key to maintaining your camera’s functionality.
Firmware Updates and Software Resets
Keeping your Lumix G100’s firmware up-to-date is crucial. Check for updates regularly on the Panasonic support website. Download and install new versions to fix bugs and add features.
To update:
- Charge the battery fully
- Insert an empty SD card
- Download firmware to your computer
- Copy the file to the SD card
- Insert the card into the camera
- Follow on-screen prompts
If you encounter issues, try a software reset. This can resolve minor glitches without erasing your settings.
To reset:
- Go to the Setup menu
- Select “Reset”
- Choose “Reset Recording Settings” or “Reset Network Settings”
Handling and Care for Camera Accessories
Proper care of accessories extends their life and protects your camera. Handle the battery pack with care. Store it in a cool, dry place when not in use. Avoid extreme temperatures.
Clean your lenses regularly with a microfiber cloth. Use a blower to remove dust before wiping. For stubborn marks, use lens cleaning solution sparingly.
Accessory | Care Tips |
---|---|
Lenses | Use lens caps, clean gently |
Filters | Store in protective cases |
Tripod | Check and tighten screws regularly |
Cables | Coil loosely, avoid kinks |
When using the AC adaptor or USB cables, avoid yanking or twisting. Unplug by gripping the connector, not the cord. Keep connections clean and free from debris.
Store your camera and accessories in a padded bag when not in use. This protects against dust and minor impacts. Use silica gel packets in humid environments to prevent moisture damage.
Frequently Asked Questions
The Lumix G100 can sometimes experience issues that affect its performance. Users may encounter problems with power, display, settings, and memory cards. Panasonic provides resources to help troubleshoot these common concerns.
Why is my Lumix G100 not powering on?
Check the battery charge level. Ensure it’s properly inserted. Try a different battery if available. Verify the power button isn’t stuck. If these steps fail, the camera may need professional service.
What can cause a black screen issue on my Lumix G100 camera?
A black screen can result from several factors. Check if the lens cap is on. Ensure the battery has sufficient charge. Try resetting the camera settings. If the problem persists, there might be an issue with the LCD or EVF that requires repair.
How can I perform a factory reset on the Lumix G100?
To reset your Lumix G100:
- Go to the menu
- Navigate to Setup
- Select “Reset”
- Choose “Reset Recording Settings” or “Reset Network Settings”
- Confirm your choice
This will restore default settings. Your images and personal data will remain intact.
What should I do if I receive a memory card error message on my Panasonic Lumix G100?
First, turn off the camera and remove the card. Reinsert it and power on. If the error persists, try formatting the card in-camera. Ensure you’ve backed up any important data beforehand. If issues continue, the card may be faulty and need replacement.
How can I access the troubleshooting manual for the Lumix G100?
You can find the Lumix G100 manual online. It contains a troubleshooting section with solutions to common problems. Panasonic’s official support page also offers additional resources and guides.
Is it possible to repair a Lumix camera that has been damaged?
Yes, you can often repair damaged Lumix cameras. Minor issues may be fixable at home. For more serious problems, contact Panasonic support or an authorized service center. They can assess the damage and provide repair options or replacement if necessary.
Issue | First Step | Second Step | Professional Help? |
---|---|---|---|
Power | Check battery | Try different battery | If unresolved |
Black Screen | Check lens cap | Reset settings | If persists |
Memory Card Error | Reinsert card | Format in-camera | If error remains |
Physical Damage | Assess severity | Contact support | For most cases |