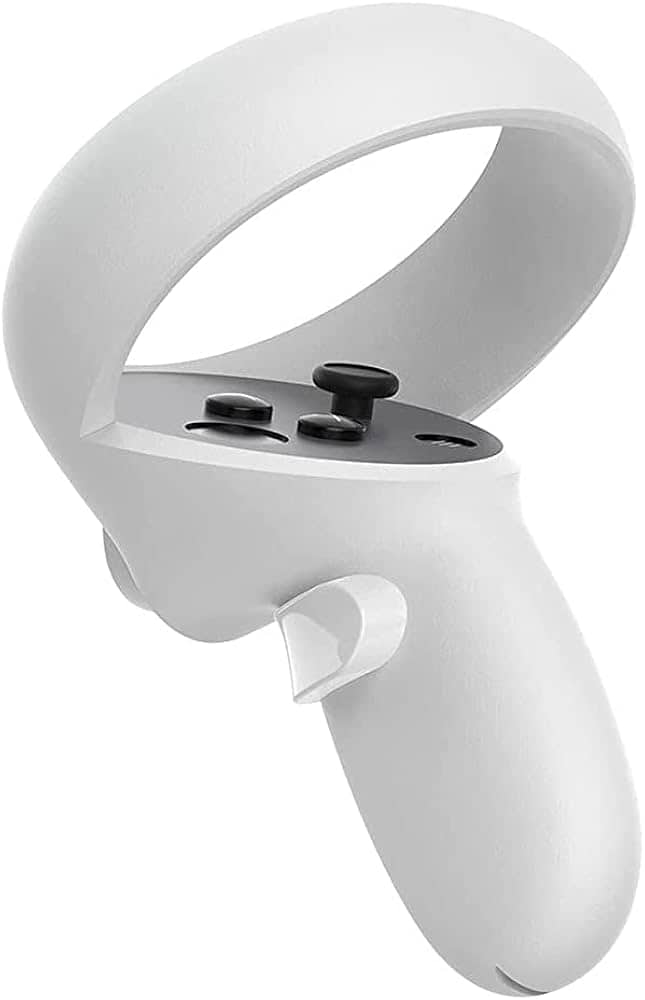
Keeping your Oculus controllers charged is key to enjoying uninterrupted virtual reality experiences. To charge Oculus Quest and Quest 2 controllers, you need to replace the included disposable AA batteries with rechargeable ones. This simple switch allows you to recharge your controllers whenever needed, saving money and reducing waste in the long run.
Many users opt for rechargeable NiMH AA batteries, which offer good performance and can be recharged hundreds of times. When your controller batteries run low, you’ll notice a notification in your headset. At this point, you can swap out the drained batteries for freshly charged ones and continue your VR session without missing a beat.
For added convenience, consider buying four rechargeable batteries instead of just two. This way, you can always have a fully charged pair ready to go while the other set is recharging. A quality battery charger is also essential for maintaining your rechargeable batteries and ensuring they last as long as possible.
| Charging Method | Pros | Cons |
|---|---|---|
| Rechargeable AA Batteries | Cost-effective, environmentally friendly | Requires initial investment, needs separate charger |
| Disposable AA Batteries | Readily available, no charging needed | Ongoing cost, less eco-friendly |
| Charging Dock (Quest 3) | Convenient, all-in-one solution | More expensive, only available for newer models |
Charging Your Oculus Controllers
Keeping your Oculus controllers charged is essential for uninterrupted VR gaming. Here’s how to power up those controllers and get back in the game:
1. Using the Included AA Batteries
- Most Oculus controllers come with AA batteries. You can use these to power your controllers right out of the box.
- When the batteries run low, simply replace them with fresh ones. Make sure to insert the batteries with the correct polarity.
2. Rechargeable Batteries and Charging Solutions
- Invest in rechargeable AA batteries: This is a more eco-friendly and cost-effective option in the long run.
- Oculus sells official rechargeable battery packs: These often come with a charging dock for convenient charging.
- Third-party rechargeable batteries and chargers are also available: Make sure they are compatible with your Oculus controller model.
3. Charging Docks (if applicable)
- If you have a charging dock, place the controllers on the dock to charge. The dock usually connects to a power source via USB.
- Make sure the controllers are properly seated on the dock. You’ll typically see an indicator light to confirm they are charging.
4. Charging Best Practices
- Fully charge the controllers before first use.
- Don’t let the batteries completely drain before recharging.
- Store the controllers in a cool, dry place when not in use.
- If you’re using rechargeable batteries, avoid overcharging them.
5. Troubleshooting
- Controllers not charging? Check the battery connections, charging cable, and power source.
- Battery life seems short? Dim the controller LEDs or reduce haptic feedback intensity in the Oculus settings.
- Still having issues? Refer to the Oculus support website for troubleshooting tips or contact customer support.
Table of Charging Methods
| Method | Description |
|---|---|
| AA Batteries | Use included or replacement AA batteries |
| Rechargeable Batteries | Use rechargeable AA batteries with a charger |
| Charging Dock | Place controllers on a charging dock |
Extending Controller Battery Life
Here are some tips to maximize your Oculus controller battery life:
- Turn off the controllers when not in use.
- Reduce the brightness of the controller LEDs.
- Lower the haptic feedback intensity.
- Store the controllers in a cool, dry place.
- Keep the controller firmware up to date.
Understanding Oculus Controllers
Oculus controllers are essential components of the virtual reality experience. They translate hand movements into the digital world, allowing users to interact with virtual objects and environments.
Overview of Oculus Quest and Quest 2 Controllers
Oculus Quest and Quest 2 controllers are wireless devices that pair with their respective headsets. They feature analog sticks, buttons, and triggers for input. These controllers use infrared LEDs tracked by the headset’s cameras to determine their position in 3D space.
Each controller has a grip button, trigger, two face buttons, and a menu or system button. The Quest 2 controllers offer improved ergonomics and longer battery life compared to the original Quest controllers.
Battery life can last up to 30 hours on a single AA battery. To replace batteries, locate the eject symbol on the controller and gently push to open the compartment.
Compatibility and Design
Quest and Quest 2 controllers are not cross-compatible due to differences in tracking technology. The Quest 2 controllers have a more streamlined design with better weight distribution.
Both controller sets use similar button layouts, making it easy for users to switch between models. The Touch controllers are designed to be intuitive, mimicking natural hand movements in VR.
| Feature | Quest Controllers | Quest 2 Controllers |
|---|---|---|
| Battery Type | AA | AA |
| Battery Life | ~20 hours | ~30 hours |
| Tracking | 4 LEDs | 3 LEDs |
| Weight | Heavier | Lighter |
The controllers’ haptic feedback enhances immersion by providing tactile sensations during gameplay. This feature helps users feel more connected to the virtual world they’re exploring.
Preparing to Charge Oculus Controllers
Proper preparation ensures your Oculus controllers stay powered and ready for use. This involves checking battery levels and choosing the right power source.
Assessing Battery Needs
Oculus Quest and Quest 2 controllers use AA batteries. Check battery levels through the Oculus app or headset menu. Low battery warnings appear when power drops below 15%. Replace batteries promptly to avoid interruptions during gameplay.
Keep spare batteries on hand. For frequent users, consider buying four rechargeable batteries. This allows two to be charging while two are in use.
Selecting the Right Batteries
Choose between disposable alkaline or rechargeable NiMH batteries. Alkaline batteries offer longer life but create waste. Rechargeable NiMH batteries are eco-friendly and cost-effective over time.
| Battery Type | Pros | Cons |
|---|---|---|
| Alkaline | Longer life, Widely available | Environmental waste, Higher long-term cost |
| NiMH | Reusable, Cost-effective | Initial higher cost, Requires charger |
For rechargeable options, use a compatible battery charger. Look for NiMH batteries rated at 2000mAh or higher for extended playtime. Ensure the charger matches the battery type to prevent damage.
Store spare batteries in a cool, dry place. This extends their shelf life and ensures they’re ready when needed.
Charging Methods and Equipment
Oculus controllers require specific charging methods and equipment to maintain optimal performance. Different options are available to keep your controllers powered up and ready for use.
Using Charging Docks and Stations
Charging docks provide a convenient way to power up your Oculus controllers. These docks often come with rechargeable batteries and special battery covers for your controllers. To use them:
- Replace the original battery covers with the ones provided
- Insert the rechargeable batteries
- Place controllers in the dock when not in use
Popular options include the Anker charging dock, which can charge both the headset and controllers simultaneously. This method eliminates the need for frequent battery changes and ensures your controllers are always ready.
Benefits of charging docks:
- Convenient storage
- Simultaneous charging of multiple devices
- Reduced battery waste
Alternative Charging Options
If you don’t have a charging dock, you can still keep your controllers powered. Standard AA batteries work well, but rechargeable ones are more cost-effective long-term. Here’s a comparison:
| Battery Type | Pros | Cons |
|---|---|---|
| Disposable AA | Widely available | Environmental impact |
| Rechargeable AA | Cost-effective | Initial investment |
| Lithium-ion | Long-lasting | Requires special charger |
To charge Oculus Quest 2 controllers without a dock, simply replace the batteries when needed. Some users prefer external battery chargers for their rechargeable AAs. This method allows you to always have a fresh set ready.
Wireless charging options are also emerging, though less common. These typically require special battery covers or adapters to work with your controllers.
Maintaining Optimal Battery Life
Proper battery management extends the lifespan of your Oculus Quest 2 controllers. Regular maintenance and smart usage habits keep your controllers powered up for longer gaming sessions.
Optimizing Usage Cycles
To maximize battery life, remove batteries when not in use for extended periods. This prevents power drain and potential corrosion. Use high-quality rechargeable batteries for cost-effectiveness and environmental benefits.
Lithium AA batteries often outperform alkaline options. They provide more consistent power output and last longer. Charge your Quest 2 controllers only when battery levels drop below 20%.
Keep batteries at room temperature. Extreme heat or cold can reduce their efficiency. Clean the battery contacts regularly with a soft, dry cloth to ensure good connections.
| Battery Type | Pros | Cons |
|---|---|---|
| Rechargeable | Cost-effective, eco-friendly | Higher upfront cost |
| Alkaline | Readily available, cheap | Shorter lifespan |
| Lithium | Long-lasting, consistent power | More expensive |
Tips for Extended Gaming Sessions
For marathon VR sessions, keep spare batteries on hand. Swap them out quickly to minimize interruptions. Turn off controllers when taking breaks to conserve power.
Adjust controller settings to balance performance and battery life. Lower vibration intensity and LED brightness to reduce power consumption. These tweaks can extend playtime without significantly impacting experience.
Consider using a charging dock for convenience. It provides a dedicated spot for your controllers and ensures they’re always ready.
Monitor battery levels through the Oculus app or in-VR menu. This helps you plan charging or battery swaps before they’re critically low.
Frequently Asked Questions
Charging Oculus Quest controllers involves specific steps and battery requirements. Here are answers to common questions about powering these devices.
What are the steps to charge Oculus Quest 2 controllers?
Oculus Quest 2 controllers use AA batteries. To replace the battery:
- Locate the eject symbol on the controller grip.
- Slide the battery compartment cover up.
- Remove the old battery.
- Insert a new AA battery, negative end first.
- Close the compartment cover.
Which type of batteries do Oculus Quest 2 controllers require?
Oculus Quest 2 controllers use standard AA batteries. You can use either disposable or rechargeable AA batteries. Rechargeable batteries may save money over time.
Is there a way to charge Oculus Quest 2 controllers without a charging dock?
You cannot directly charge Oculus Quest 2 controllers. They use replaceable AA batteries. To keep your controllers powered:
- Use rechargeable AA batteries.
- Charge these batteries in a separate charger.
- Swap them into your controllers when needed.
What could be the reason my Oculus controller is not charging?
Oculus controllers don’t charge directly. If your controller isn’t working:
- Check if the battery is inserted correctly.
- Try a fresh battery.
- Ensure the battery compartment is closed properly.
- Restart your headset if issues persist.
How do you charge Oculus Quest 1 controllers?
Oculus Quest 1 controllers also use AA batteries. The process is similar to Quest 2:
- Slide open the battery compartment.
- Remove the old battery.
- Insert a new AA battery.
- Close the compartment.
How can I turn on my Oculus controllers?
Oculus controllers turn on automatically when you pick them up. If they don’t:
- Press any button on the controller.
- If unresponsive, check the battery.
- Replace the battery if needed.
- Ensure the controller is paired with your headset.
| Controller Model | Battery Type | Charging Method |
|---|---|---|
| Quest 2 | AA | Replaceable |
| Quest 1 | AA | Replaceable |


