Disabling IPv6 on Windows 11 can solve network issues and improve compatibility with certain devices or services. Users can turn off IPv6 through Windows Settings, Command Prompt, or PowerShell in a few simple steps. This process may enhance network performance and resolve connectivity problems on some systems.
IPv6 is a newer internet protocol designed to replace IPv4. While it offers benefits like increased address space and improved security, it can sometimes conflict with older hardware or software. Disabling IPv6 doesn’t typically cause problems for most home users, as IPv4 remains widely supported.
Windows 11 provides multiple methods to disable IPv6, catering to users with different technical skills. From graphical interfaces to command-line options, the operating system offers flexibility in managing network protocols. This allows users to optimize their network settings based on their specific needs and environment.
Disabling IPv6 in Windows 11
While IPv6 is the future of internet addressing, there might be situations where you need to disable it on your Windows 11 machine for troubleshooting or network compatibility reasons. Here’s how:

Method 1: Through Network Connections
This is the most common and straightforward method:
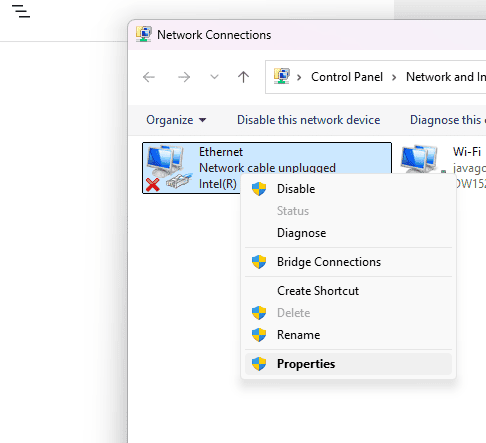
- Open Network Connections: Right-click the Start button and select Network Connections.
- Select Your Network Adapter: Choose the network adapter you want to disable IPv6 on (e.g., Wi-Fi or Ethernet).
- Access Properties: Right-click on the adapter and select Properties.
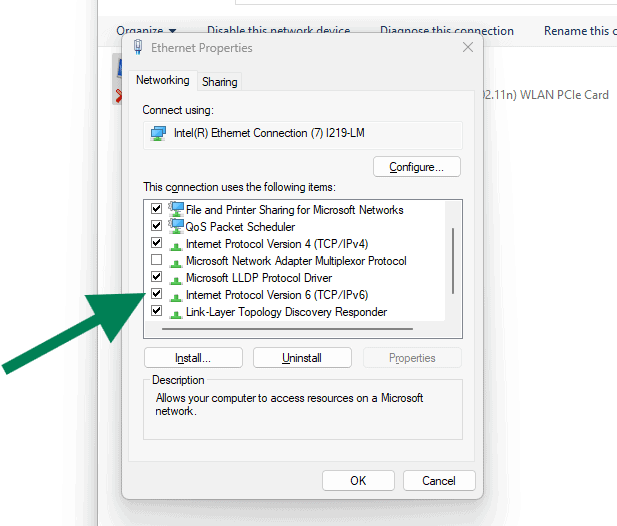
- Uncheck IPv6: Scroll down in the list and uncheck the box next to Internet Protocol Version 6 (TCP/IPv6).
- Confirm: Click OK to save the changes.

Method 2: Using PowerShell
For those who prefer command-line operations:
- Open PowerShell as Administrator: Search for PowerShell in the Start menu, right-click on it, and select Run as administrator.
- Identify Your Network Adapter: Run the following command to get a list of your network adapters:
Get-NetAdapterNote down the Interface Name of the adapter you want to modify (e.g., “Wi-Fi” or “Ethernet”).
- Disable IPv6: Run the following command, replacing
"Interface Name"with the actual name of your adapter:
Disable-NetAdapterBinding -Name "Interface Name" -ComponentID ms_tcpip6- Verify: You can verify that IPv6 is disabled by running the following command:
Get-NetAdapterBinding -Name "Interface Name"Method 3: Through Device Manager
- Open Device Manager: Right-click the Start button and select Device Manager.
- Expand Network Adapters: Find your network adapter in the list.
- Access Properties: Right-click the adapter and select Properties.
- Disable IPv6: Go to the Advanced tab. In the Property list, find Internet Protocol Version 6 (TCP/IPv6). Set the Value to Disabled.
- Confirm: Click OK to save the changes.
Important Notes:
- Restart: After disabling IPv6, it’s recommended to restart your computer for the changes to take full effect.
- Re-enable if Needed: If you encounter any network issues or need IPv6 functionality later, simply follow the same steps and re-enable it.
- Troubleshooting: If you’re disabling IPv6 to troubleshoot a specific problem, remember to re-enable it once you’ve resolved the issue.
By following these methods, you can easily disable IPv6 on your Windows 11 system. Remember to proceed with caution and only disable IPv6 if you have a specific reason to do so.
Key Takeaways
- Disabling IPv6 on Windows 11 can resolve network issues and improve compatibility
- Users can turn off IPv6 using Windows Settings, Command Prompt, or PowerShell
- Turning off IPv6 is generally safe for home users as IPv4 remains widely supported
Disabling IPv6 in Windows 11
Turning off IPv6 in Windows 11 can be done through several methods. Each approach offers different levels of control and complexity for users seeking to modify their network settings.
Accessing Network Adapter Settings
To begin disabling IPv6, users need to access their network adapter settings. Open the Control Panel and navigate to “Network and Sharing Center.” Click on “Change adapter settings” to view all network connections.
Right-click on the active network adapter and select “Properties.” This opens a window displaying various networking components. The list includes “Internet Protocol Version 6 (TCP/IPv6).”
Modifying IPv6 Settings via Network Properties
In the network adapter properties, locate “Internet Protocol Version 6 (TCP/IPv6).” Uncheck the box next to this option to disable IPv6 for that specific adapter.
Click “OK” to save the changes. This method allows users to disable IPv6 on individual adapters, which is useful for systems with multiple network connections.
For users with several adapters, repeat this process for each one as needed.
Using Command Prompt for IPv6 Deactivation
Command Prompt offers a more advanced method for disabling IPv6. Open Command Prompt as an administrator.
Type the following command:
netsh interface ipv6 set global randomizeidentifiers=disabled
Press Enter to execute. This command disables IPv6 across all network adapters.
For a more targeted approach, use:
netsh interface ipv6 set interface "Interface Name" disabled
Replace “Interface Name” with the actual name of your network adapter.
Ensuring System Stability Before Changes
Before making any changes, create a system restore point. This allows for easy reversal if issues arise.
Open the Start menu and search for “Create a restore point.” Select the system drive and click “Create.”
It’s also wise to note current network settings. Take screenshots or write down important configuration details.
Troubleshooting Post-Disabling IPv6
After disabling IPv6, some users may experience connectivity issues. Check if websites load properly and if local network resources are accessible.
If problems occur, re-enable IPv6 temporarily to isolate the cause. Some applications or services may require IPv6 to function correctly.
Update network drivers if issues persist. Open Device Manager, locate the network adapter, right-click, and select “Update driver.”
Re-enabling IPv6 if Required
To re-enable IPv6, return to the network adapter properties. Check the box next to “Internet Protocol Version 6 (TCP/IPv6).”
Alternatively, use Command Prompt:
netsh interface ipv6 set interface "Interface Name" enabled
Replace “Interface Name” with your adapter’s name.
Restart the computer after re-enabling IPv6 to ensure all changes take effect properly.


