An FTP server on Windows allows users to access files over the internet, providing a simple way to upload and download data. With Windows 10 and Windows 11, users have the built-in ability to install this feature and set up their own FTP server. This kind of server can be vital for businesses or individuals that require a reliable method for file transfer without relying on third-party services.
Setting up the server involves a series of steps beginning with enabling the necessary Windows features. In Windows Settings, a user activates the FTP server functions and configures the firewall to allow FTP connections. This setup includes selecting the right directories to share and establishing user permissions, making sure there’s a balance between accessibility and security.
Setting Up Your Own FTP Server in Windows
Installing IIS and FTP Server
- Turn on Windows Features: Go to “Control Panel” -> “Programs” -> “Turn Windows features on or off”.
- Select Features: Under “Internet Information Services,” tick the boxes for “FTP Server” and “Web Management Tools.”
- Click OK: Windows will install the necessary components.
Creating an FTP Site
- Open IIS Manager: Search for “Internet Information Services (IIS) Manager” and open it.
- Add FTP Site: Right-click on “Sites” and choose “Add FTP Site.”
- Enter Details: Give your site a name and select the folder where you want to store files for FTP access.
- Configure Bindings and SSL: Choose the IP address and port (usually 21) for your FTP server. Decide whether to use SSL for secure connections.
- Set Authentication and Authorization: Choose “Basic” for authentication and specify which users or groups can access the FTP site.
Configuring Firewall
- Open Windows Firewall: Search for “Windows Firewall with Advanced Security” and open it.
- Inbound Rules: Go to “Inbound Rules” and create a new rule to allow FTP traffic (port 21).
- Allow FTP Server: If prompted, allow the “FTP Server” app through the firewall.
Testing Your FTP Server
- FTP Client: Use an FTP client like FileZilla or WinSCP.
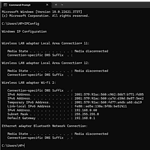
- Connect: Enter your server’s IP address, port (21), username, and password.
- Access Files: If the connection is successful, you should be able to see the files in your designated FTP folder.
Additional Tips
- User Isolation: For enhanced security, consider enabling user isolation in IIS to restrict each user to their own folder.
- Passive Mode: If you’re having trouble connecting, try using passive mode in your FTP client.
- Documentation: Refer to Microsoft’s documentation for detailed instructions and troubleshooting.
By following these steps, you can easily set up an FTP server on your Windows machine, enabling easy file sharing and management over the internet.
Key Takeaways
- An FTP server on Windows facilitates easy file transfer via the internet.
- Users can enable and set up an FTP server directly in Windows 10 and 11.
- The setup process includes configuring system settings and firewall permissions.
Setting Up the FTP Server on Windows
Setting up an FTP server on a Windows machine involves several key steps. This process enables users to transfer files to and from the server securely.
Preparing Windows Features
First, one must ensure that the necessary Windows features are enabled. This includes activating the FTP Server and its role services. These can be found by going to the Control Panel, selecting Programs, and then clicking on Programs and Features. Here, one should choose Turn Windows features on or off to access the necessary options.
Configuring FTP Service in IIS Manager
After enabling the FTP server role, the next step is to set up the service using Internet Information Services (IIS) Manager. Start by opening Administrative Tools from the Control Panel, then launch the IIS Manager. Here, expand Sites and select Add FTP Site to create a new FTP site, giving it a name and assigning a content directory. Users then have to configure the IP address, choose whether to enable SSL, and set the authentication and authorization information. This will define who can access the server and with what permissions.
Configuring Network and Firewall Settings
The Windows Firewall must allow the FTP server to communicate with the network. To configure the firewall, users should go to Control Panel → System and Security → Windows Defender Firewall and then click on Allow an app through Windows Firewall. Ensure the FTP server is checked for both private and public networks if necessary. Remember to adjust the router settings as well by adding a port forwarding rule for the FTP service.
Enabling User Access and Security
To allow access to the FTP server, users need specific permissions. These permissions define what actions they can perform, such as reading or writing files. Set up user accounts and specify the access rights for each one. For security, it’s recommended to use strong authentication methods. When necessary, employ SSL to encrypt connections, ensuring safe data transfer.
In creating an FTP server on a Windows computer, these steps will enable the setup and management of a functional and secure service. This allows for efficient file sharing within a network or even with external partners when configured appropriately.