Google Slides offers powerful image editing capabilities, allowing users to enhance their presentations with visually appealing graphics. Users can easily insert, resize, crop, and adjust images directly within the platform, eliminating the need for external editing software. This free tool empowers presenters to create professional-looking slides without advanced design skills.
The image editing options in Google Slides are user-friendly and accessible. From basic adjustments like brightness and contrast to more advanced features like masking and transparency, users have a wide range of tools at their disposal. These features enable presenters to customize images to fit their specific needs and create cohesive, visually striking presentations.

Working with Images in Google Slides
Google Slides provides a robust set of tools for manipulating images within your presentations. Let’s explore some common image editing tasks and how to achieve them:
Inserting Images
To add an image to a Google Sheet, click “Insert” in the menu bar. Choose “Image” and select “Image in cell” or “Image over cells.” You can upload from your device, use a URL, or pick from Google Drive. For cell images, the picture fits inside the cell. For over-cell images, it floats on top of the sheet.
Another method is the IMAGE function. Type =IMAGE(“URL”) in a cell, replacing “URL” with the image link. This embeds the picture directly in the cell.
Flipping and Rotating Images
- Select the image: Click on the image you want to manipulate.
- Access the rotate options: In the toolbar, click on “Rotate.” You’ll see options to rotate the image 90 degrees clockwise or counterclockwise, or to flip it horizontally or vertically.
- Fine-tune rotation: For more precise rotation, use the rotation handle that appears above the image when it’s selected. Click and drag the handle to rotate the image freely.
Overlapping and Layering Images
To overlap images, simply drag and drop one image on top of another. To control the layering order (which image appears in front), use the “Arrange” options:
- Select the image: Click on the image you want to move.
- Arrange the image: Go to “Arrange” > “Order” and choose either “Bring forward,” “Bring to front,” “Send backward,” or “Send to back.”

Cropping and Shaping Images
Google Slides allows you to crop images and even crop them into specific shapes:
- Select the image: Click on the image you want to crop.
- Crop the image: Go to “Crop.” Black handles will appear around the image. Click and drag these handles to adjust the cropping area.
- Crop to a shape (optional): While the image is still selected, go to “Crop” > “Shape” and choose a shape from the list. The image will be cropped to fit within that shape.
- Mask an image (optional): For more complex shapes, you can use the “Mask image” option. This allows you to use any shape as a mask to hide parts of the image. Go to “Crop” > “Mask image” and choose a shape.
Adding Borders and Transparency
Enhance your images with borders and transparency effects:
- Select the image: Click on the image.
- Add a border: Go to “Border color” and choose a color for the border. You can also adjust the border weight (thickness) and dash style.
- Adjust transparency: Go to “Format” > “Image” > “Adjustments” and use the “Transparency” slider to make the image more or less transparent.
Grouping and Linking Images
For easier manipulation, group multiple images together or add links to them:
- Select multiple images: Hold down Ctrl (or Cmd on a Mac) and click on each image you want to select.
- Group the images: Go to “Arrange” > “Group.”
- Add a link (optional): With an image selected, go to “Insert” > “Link” and enter the URL you want to link to.
Replacing and Deleting Images
Need to swap out an image or remove it entirely?
- Replace an image: Right-click on the image and select “Replace image.”
- Delete an image: Select the image and press the Delete key.
Positioning Images with Text
Control how images interact with text in your slides:
- Place text over an image: Simply insert a text box and position it over the image.
- Wrap text around an image: Select the image, go to “Wrap text,” and choose a wrapping style (e.g., “Wrap around”).
- Put an image behind text: Select the image and use the “Arrange” > “Order” > “Send to back” option to place it behind the text.
Troubleshooting Blurry Images
If you’re seeing blurry images in your slides, here are a few things to check:
- Image source: Make sure you’re using the highest-resolution version of the image available. If you’re downloading images from the web, look for larger sizes or higher-quality versions.
- Image scaling: Avoid scaling images up too much. If you need a larger image, try finding a higher-resolution version instead of stretching a small one.
- Compression: If you’re using compressed images, try reducing the compression level or using a different compression format.
Combining Images: Overlapping, Merging, and Grouping
Google Slides offers a few ways to “combine” images, depending on what you want to achieve:
- Overlapping: You can simply drag and drop one image on top of another to create an overlapping effect. Use the “Arrange” options to control which image appears in front.
- Merging: Google Slides doesn’t have a built-in feature to merge multiple images into a single image. If you need to do this, you’ll need to use an external image editor like Photoshop or GIMP.
- Grouping: You can group multiple images together so that they can be moved and resized as a single unit. This is helpful for creating complex layouts or keeping related images together.
Changing the Shape of an Image: Cropping and Masking
Google Slides allows you to change the shape of an image by cropping it or masking it.
- Cropping: You can crop an image to remove unwanted parts or to change its aspect ratio. You can also crop an image to a specific shape, such as a circle or a star.
- Masking: Masking is a more advanced technique that allows you to use any shape as a mask to hide parts of an image. This can be used to create unique effects or to remove complex backgrounds from images.
Fading Images with Transparency
You can adjust the transparency of an image to create a fading effect. This can be used to make an image less prominent or to create a gradual transition between images.
To adjust the transparency of an image, select the image and go to “Format” > “Image” > “Adjustments.” Use the “Transparency” slider to make the image more or less transparent.
Rounding Image Corners
To give your images a softer look, you can round their corners. This is a subtle effect that can make a big difference in the overall appearance of your slides.
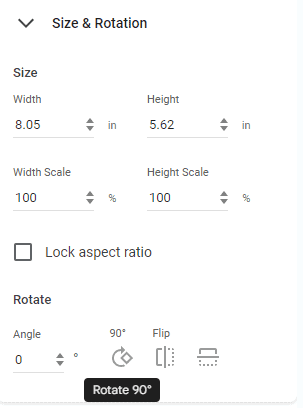
To round the corners of an image, select the image and go to “Format options.” In the “Size & rotation” section, you’ll find an option to adjust the corner radius. Increase the radius to create more rounded corners.
Removing Image Backgrounds
Unfortunately, Google Slides doesn’t have a built-in tool to remove image backgrounds. If you need to remove the background from an image, you’ll need to use an external image editor like remove.bg or Photoshop.
As a workaround, you can try using the masking technique to hide the background of an image. However, this might not be as precise as a dedicated background removal tool.
These are just a few of the many ways you can work with images in Google Slides. Experiment with the different tools and options to create visually engaging presentations that effectively communicate your message.
Can You Blur An Image in Google Slides?
Unfortunately, Google Slides doesn’t offer a direct way to blur an image like some other image editing programs do. There’s no built-in filter or effect that you can simply apply to an image to make it blurry. This might seem like a surprising omission, but it’s likely due to Google Slides’ focus on being a presentation tool rather than a full-fledged image editor.
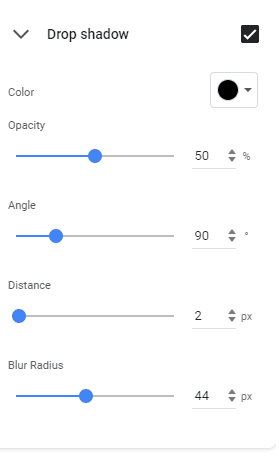
The only blurring capability within Google Slides is related to drop shadows. When you add a drop shadow to an image, you can adjust the “Blur Radius” of the shadow. However, this only blurs the shadow itself, not the actual image.
So, if you’re looking to blur an image for privacy reasons, to create an artistic effect, or to emphasize certain elements, you’ll need to use a workaround or an external image editor. We’ve already covered the workaround using shapes and transparency, and using an external editor is always an option if you need more precise control over the blur effect.
Key Takeaways
- Google Slides provides built-in image editing tools for easy customization
- Users can crop, resize, and adjust images without leaving the platform
- The software offers both basic and advanced editing features for all skill levels
Image Editing Fundamentals in Google Slides
Google Slides offers powerful tools to edit images directly within presentations. Users can make basic adjustments, apply formatting, and use advanced features to enhance visuals.
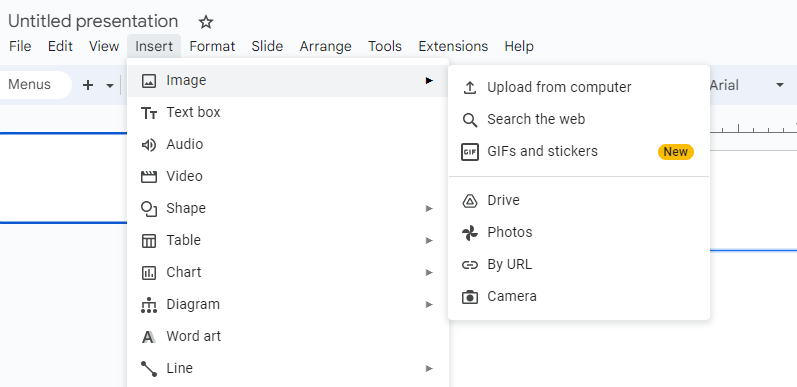
Adding and Inserting Images
To add images to a Google Slides presentation, click “Insert” in the top menu. Select “Image” and choose from various options. Upload from your computer, search the web, or use Google Drive. Drag and drop images onto slides for quick insertion.
Google Slides supports common image formats like JPEG, PNG, and GIF. After adding an image, resize it by clicking and dragging the corners. Move images around the slide by clicking and dragging.
For easy access to free images, try Storyset. This tool offers customizable illustrations that work well in presentations.
Basic Adjustments and Formatting
Google Slides provides simple tools to adjust images. Right-click an image and select “Format options” to access these features.
Use the “Size & Rotation” menu to change dimensions or angle. Adjust transparency to blend images with backgrounds. The “Recolor” option lets you apply filters or change image tones.
To crop an image, click the crop icon in the toolbar. Drag the black handles to select the desired area. For shaped crops, use the dropdown next to the crop icon.
Advanced Image Editing Tools
Google Slides offers more advanced editing options for power users. The “Adjustments” menu lets you fine-tune brightness and contrast. This helps images pop on slides.
Masking allows you to fit images into shapes. Click the arrow next to the crop tool and choose a shape. Your image will conform to that shape, creating unique visual effects.
The “Drop shadow” option adds depth to images. Customize the color, transparency, and position of the shadow for a polished look.
Remember to use the “Reset image” button if you need to start over. This returns the image to its original state.


