Taking screenshots on a Chromebook is simple and quick. Chrome OS offers multiple ways to capture your screen, from full-screen grabs to partial selections. Press Ctrl + Show Windows key to snap a full screenshot instantly. This handy shortcut saves time and effort when you need to capture your entire display.
Chromebooks also let you capture specific parts of your screen. Use the Screen Capture tool to select an area, window, or the full screen. You can access this tool from the Quick Settings menu or by pressing Ctrl + Shift + Show Windows. Your screenshots are saved automatically to the Downloads folder, making them easy to find and share.
Capturing Your Chromebook Screen
Taking screenshots on a Chromebook is a breeze, thanks to its dedicated keyboard shortcuts. Here’s a simple guide to capturing your screen or a portion of it.
Taking a Full Screenshot
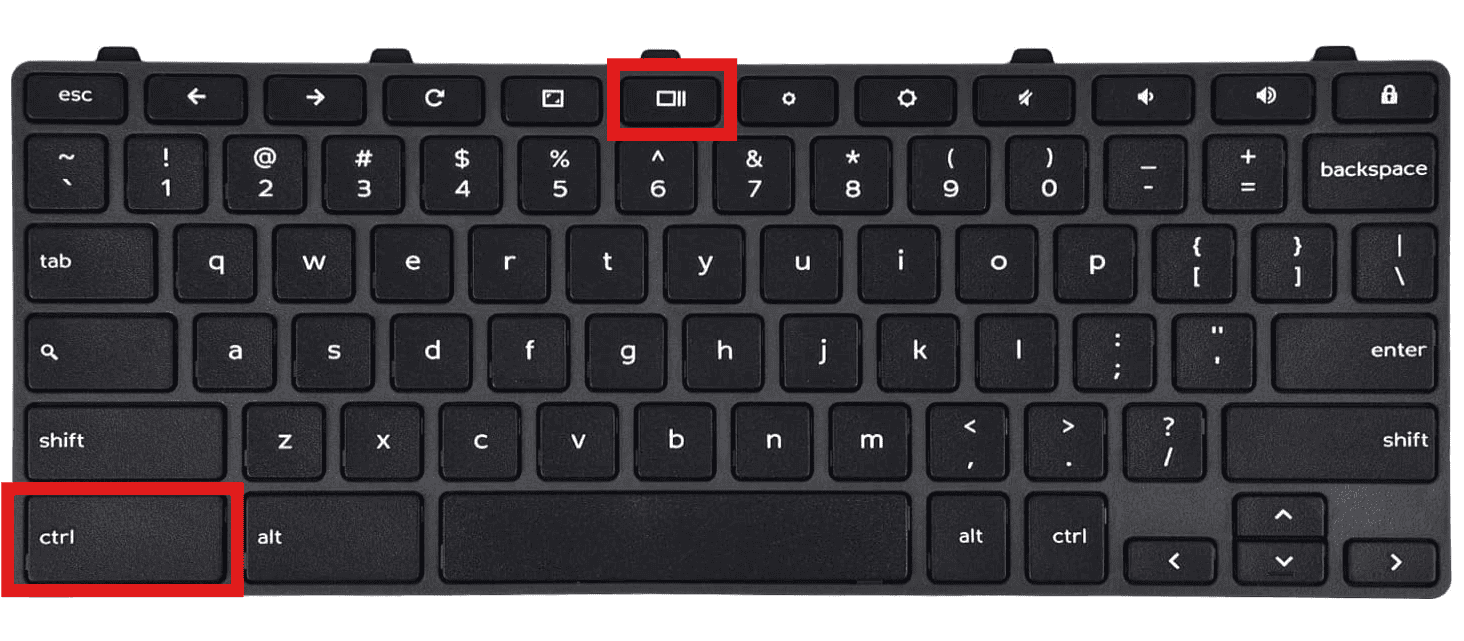
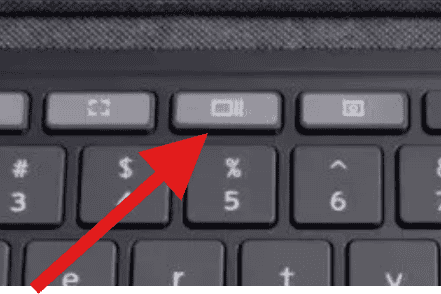
To capture the entire screen, press the Ctrl key and the Show windows key simultaneously. The Show windows key looks like a rectangle with two lines next to it and is usually located in the top row of the keyboard.
This captures the entire screen, including everything you see. The screenshot is automatically saved to your Chromebook’s “Downloads” folder.
Taking a Partial Screenshot
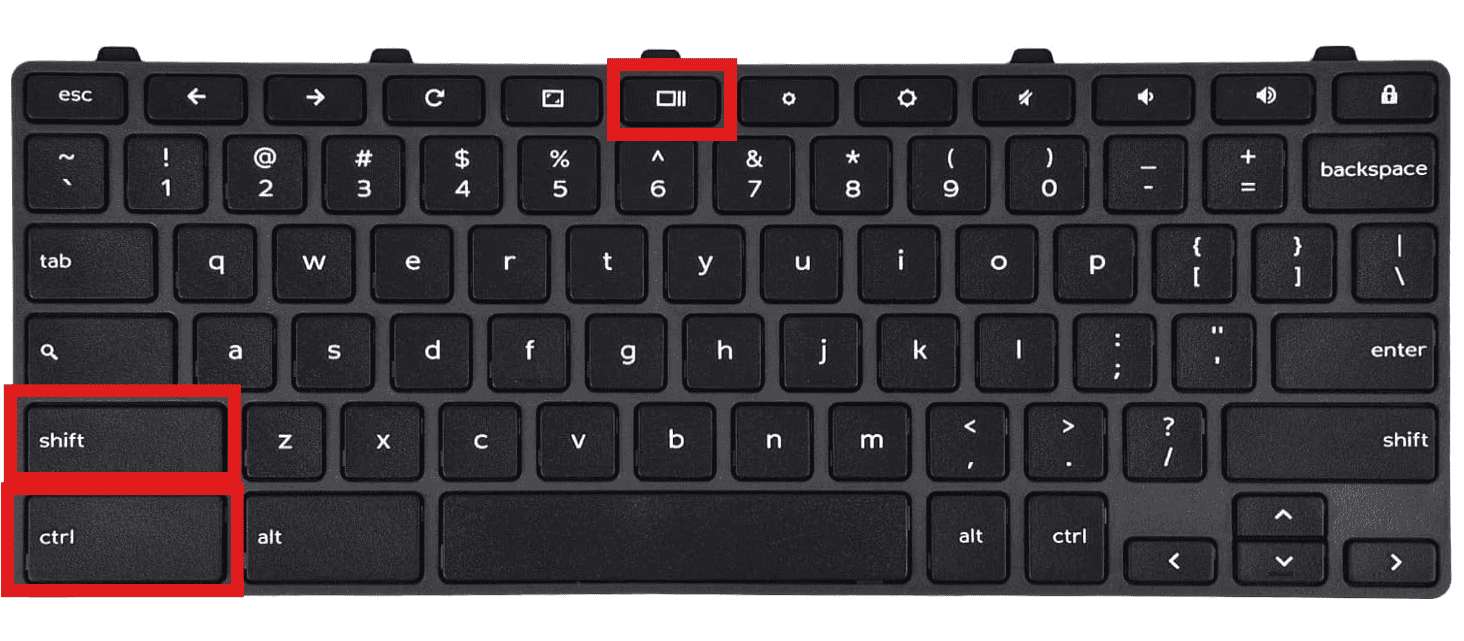
To capture a specific area of your screen, press the Ctrl, Shift, and Show windows keys together.
This will change your cursor to a crosshair. Click and drag to select the area you want to capture. Once you release the mouse button, the selected portion will be saved as a screenshot in your “Downloads” folder.
Finding Your Screenshots
Your screenshots are saved as PNG files in the “Downloads” folder. You can access them by clicking the launcher icon in the bottom left corner of the screen, then selecting the “Files” app.
Additional Tips
- Notifications: A notification will appear briefly in the bottom right corner of the screen when you take a screenshot. You can click on it to view or share the screenshot immediately.
- Image Editing: Chromebooks have built-in image editing tools. You can crop, rotate, or annotate your screenshots directly in the “Files” app or using a web-based image editor.
- External Keyboards: If you’re using an external keyboard with your Chromebook, the Show windows key might be labeled as F5 or have a different icon.
Troubleshooting
| Problem | Solution |
|---|---|
| Screenshot not working | Make sure you’re pressing the correct key combination. Try using an external keyboard if the built-in keys are not responding. |
| Can’t find screenshots | Check the “Downloads” folder in the “Files” app. If you can’t find them there, try searching for “.png” files. |
| Screenshot quality is poor | Ensure your screen resolution is set appropriately in your Chromebook’s settings. |
Key Takeaways
- Chromebooks offer multiple screenshot options for full or partial screen captures
- The Screen Capture tool provides flexibility for different screenshot needs
- Screenshots are automatically saved to the Downloads folder for easy access
Navigating Screenshot Functions on Chromebook
Chromebooks offer several easy ways to capture screenshots. Users can take full-screen, partial, or window-specific images with simple keyboard shortcuts or on-screen tools.
Taking a Full-Screen Screenshot
To capture the entire screen on a Chromebook, press Ctrl + Show Windows. The Show Windows key looks like a rectangle with two lines next to it. After pressing this combo, you’ll hear a camera click sound. Your screenshot is now saved to the Downloads folder.
You can also use the Screen Capture tool. Click the time in the bottom right corner. Select Screen Capture from the menu. Choose the Full Screen option and click anywhere on the screen to take the shot.
Capturing a Partial Screenshot
For a partial screenshot, press Ctrl + Shift + Show Windows. Your cursor turns into a crosshair. Click and drag to select the area you want to capture. Release to take the screenshot.
The Screen Capture tool also works for partial screenshots. Open it from the menu, pick the Partial option, and select your desired area.
Chromebooks save these images to the Downloads folder too. You can easily find and edit them there.
Screenshotting a Specific Window
To screenshot a single window, press Alt + Window Switcher key, then click the window you want to capture. The Window Switcher key shows overlapping squares and is usually above the 5 or 6 key.
Another method uses the Screen Capture tool. Open it, choose Window, and click the window you want to screenshot. This option is great for capturing specific apps or browser tabs.
All screenshots go to the Downloads folder by default. You can change this in Chrome OS settings if needed.


