Flashing a GPU BIOS can be an effective way to enhance the performance of a graphics card. This process updates the firmware controlling the GPU, potentially unlocking new features or improving compatibility with different PCBS and software. It can also help with fixing bugs or preparing the graphics card for overclocking, which is pushing the device beyond its original speed for better performance. However, before starting the BIOS flashing process, one should understand that it involves risks, such as rendering the graphics card unusable if not done correctly. Therefore, it is crucial to proceed with caution and follow reliable guidelines.
Why Consider Flashing Your GPU BIOS?
- Performance Improvements: Updated BIOS versions can provide better clock speeds and optimized settings for increased performance.
- Compatibility Fixes: New BIOS updates can resolve compatibility issues with certain motherboards or software.
- New Features: Some updates unlock extra features or support for newer technologies.
⚠ Warnings & Precautions
- Bricking Risk: An improper flash can render your GPU unusable (“bricking” it). Proceed with extreme caution.
- Warranty Considerations: Flashing the BIOS may void your GPU warranty. Check with the manufacturer.
- Power Stability: Ensure uninterrupted power during the flashing process. A power surge or outage could cause corruption.
How to Flash a GPU BIOS
| Step | NVIDIA GPUs | AMD GPUs |
|---|---|---|
| 1. Identify Your GPU Model | Use GPU-Z or a similar tool to determine the exact manufacturer, model, and memory type of your GPU. | Use GPU-Z or a similar tool to determine the exact manufacturer, model, and memory type of your GPU. |
| 2. Find the Right BIOS | Visit the manufacturer’s website or a trusted repository like TechPowerUp. Download a BIOS compatible with your exact GPU model. | Visit the manufacturer’s website or a trusted repository like TechPowerUp. Download a BIOS compatible with your exact GPU model. |
| 3. Backup Your Current BIOS | Use GPU-Z to save a copy of your existing BIOS as a crucial safety step. | Use ATIFlash or a similar tool to save your existing BIOS. |
| 4. Download Flashing Utilities | Download NVFlash for NVIDIA cards | Download ATIFlash for AMD cards |
| 5. Prepare for the Flash | Create a bootable USB drive (if needed), close background programs, and ensure an uninterrupted power source. Refer to utility documentation for specific instructions. | Create a bootable USB drive (if needed), close background programs, and ensure an uninterrupted power source. Refer to utility documentation for specific instructions. |
| 6. Flash the BIOS | Use NVFlash or ATIFlash with the appropriate commands to load and flash the new BIOS. Follow the utility instructions precisely. | Use NVFlash or ATIFlash with the appropriate commands to load and flash the new BIOS. Follow the utility instructions precisely. |
| 7. Reboot and Verify | Restart your PC. Use GPU-Z to check if the new BIOS version is displayed correctly. | Restart your PC. Use GPU-Z to check if the new BIOS version is displayed correctly. |
Additional Notes
- Dual BIOS GPUs: Some GPUs have a backup BIOS for recovery if the flash fails.
- Complex Cases: If instructions are unclear, seek help from reputable tech forums or professionals.
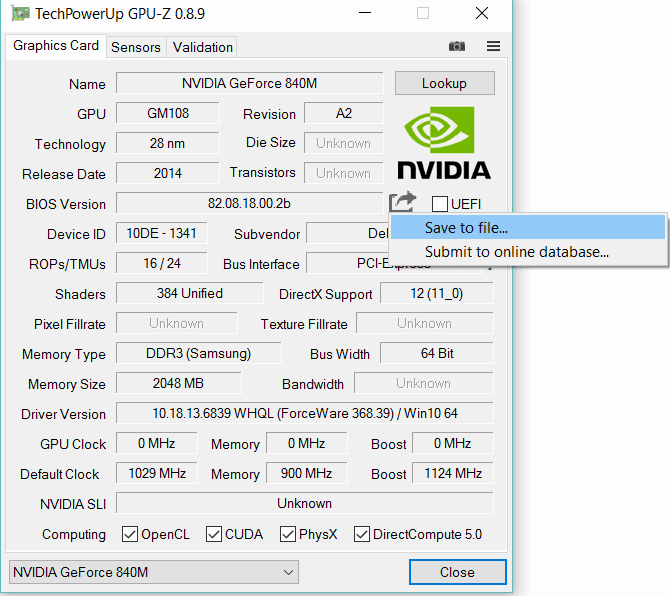
The preparation stage involves gathering the necessary tools and backing up the current GPU BIOS. Tools like NVFlash for NVIDIA GPUs and GPU-Z, a versatile utility, are vital for the flashing process. NVFlash enables users to replace the firmware on compatible NVIDIA graphics cards, while GPU-Z provides detailed information about the graphics cards and helps in backing up the existing BIOS. Users need to ensure they have the correct BIOS version for their graphics card and that their Windows system is stable to prevent interruptions during the flashing process.
When executing the BIOS flash, the user follows a series of steps that requires them to run certain commands and wait for the process to complete. It is essential to follow these steps meticulously, as any errors can have significant consequences. After the new BIOS is flashed, the user should verify that the graphics card is operating normally and check if the expected changes have taken place. Throughout the process, users should stay informed by checking FAQs and seeking help from tech forums like TechPowerUp if they encounter issues.
Key Takeaways
- BIOS flashing can improve GPU performance but carries risks.
- Proper tools and a BIOS backup must be prepared before flashing.
- Accurately executing the flash process is critical for success.
Preparing for GPU BIOS Flashing
Flashing a GPU BIOS requires careful preparation to ensure a successful update and to avoid potential issues. This section will guide you through the essential steps before undertaking this process.
Understanding the Basics of BIOS and Compatibility
GPU BIOS, which stands for Basic Input/Output System, is critical as it allows your graphics card to interact with the motherboard and other components. Before you start the flashing process, you should check the compatibility of the BIOS with your GPU model and PCB (Printed Circuit Board) layout. Visit the vendor’s website to find the correct version of the BIOS for your graphics card. Be aware that using the wrong BIOS can lead to significant performance issues or even damage your GPU.
Creating Backup of the Current GPU BIOS
Backing up your current BIOS is crucial. It serves as a safeguard should you need to restore the original settings. This can be done using tools like NVIDIA NVFlash for NVIDIA cards. To create a backup:
- Open the command prompt (CMD) as an administrator.
- Type
nvflash --save backup.romto store your original BIOS. - Ensure that the backup is stored safely before proceeding.
Safety Measures and Considerations
Taking safety measures is vital to protect your hardware. First, disable any power-saving settings that could interfere with the BIOS flashing process. Maintain steady power to prevent corruption during a BIOS update. Here’s what you need to do:
- Use
protectoffcommand: This disables BIOS protection to allow the flashing process to take place. - Keep track of voltage and fan settings: Record these so you can manage heat and power requirements after flashing.
- Monitor risks: Be aware of the possibility of artifacts or glitches post-flash and prepare to revert to the backup BIOS if needed.
- Understand the warranty: Remember that flashing your GPU BIOS might void the manufacturer’s warranty.
Flashing your GPU BIOS can unlock improved performance, but it’s essential to follow these preparatory steps to minimize risks.
Executing the GPU BIOS Flash
This section guides through the process of updating the BIOS on Nvidia and AMD graphics cards using specialized software. It is important for enhancing the performance of the card and ensuring compatibility with the system hardware.
Using nvFlash for Nvidia Graphics Cards
For Nvidia GPUs, nvFlash is the go-to utility. To begin, one must download nvFlash and extract it to a folder. It is critical to run as administrator to avoid permission issues. Nvidia’s Turing and GeForce RTX cards, including RTX 2060 up to RTX 3090, as well as older models like GTX 1060 and GTX 1080 Ti, can be updated using this method.
- First, back up the existing BIOS using the command
nvflash64 -b backup.rom. - Next, disable any BIOS protection with the command
nvflash64 --protectoff(if applicable). - To flash the BIOS, use the command
nvflash64 -6 biosfile.rom, replacing “biosfile.rom” with the name of the new BIOS file.
Flashing BIOS with ATIflash for AMD Cards
For AMD cards, ATIflash is the utility that will get the job done. Like nvFlash, it is essential to backup the current BIOS and to run the utility with administrative privileges.
- Open the command prompt and navigate to the ATIflash directory.
- Save the existing GPU BIOS with the command
atiflash -s 0 backup.rom. - Flash the new BIOS onto the card using
atiflash -f -p 0 newbios.rom, again, replace “newbios.rom” with the actual BIOS file name.
Post-Flash Procedures and Testing
After flashing the GPU BIOS, it’s important to verify the success of the process.
- Restart the computer and check if the GPU is recognized correctly.
- Use software like MSI Afterburner or EVGA Precision X1 to tweak settings like fan speed and power limit.
- Run stress tests and benchmarks to ensure stability.
If problems arise, one may need to re-flash the BIOS or, if the card has a dual BIOS switch, use it to recover from any issues. Remember that once a card is flashed, it may no longer be covered by warranty, and there is a risk of the card being bricked if the process goes wrong. Proceed with caution and at your own risk.
Frequently Asked Questions
Upgrading the BIOS of a GPU can enhance performance and compatibility. This section answers common questions to help users through the process.
How do I update my GPU BIOS on Windows 10?
To update your GPU BIOS on Windows 10, download the correct BIOS update from the manufacturer’s website. Then, use a flashing tool like NVFlash for NVIDIA cards. Always back up the current BIOS before proceeding, and follow the instructions provided by the utility.
What is the process for flashing a GPU BIOS on an AMD card?
Flashing a GPU BIOS on an AMD card involves using AMD’s flashing utility. First, save the current BIOS with a tool like GPU-Z. Then, use the flashing software to update with a new BIOS file. Keep accurate notes on your original BIOS settings in case you need to revert.
Can I update my graphics card BIOS without a display?
Although challenging, it is possible to update a graphics card BIOS without a display by using a secondary integrated GPU or another graphics card. This allows you to boot the system and perform the update. Detailed steps should be obtained from the card or motherboard manufacturer’s instructions.
Where can I find the latest NVIDIA GPU BIOS downloads?
NVIDIA doesn’t directly provide GPU BIOS downloads. Instead, visit your card manufacturer’s website to find the latest BIOS. Look for support or downloads related to your specific card model.
Is it necessary to update my BIOS when installing a new GPU?
Updating the BIOS is not always necessary when installing a new GPU, but it can resolve compatibility issues. Check with the GPU and motherboard manufacturer to see if an update is recommended based on your hardware configuration.
How do I ensure my BIOS is configured correctly for my GPU?
Check the motherboard manual for BIOS settings that relate to graphics. This typically includes setting the primary display adapter to PCI-E and disabling onboard graphics if using a dedicated card. Save changes and exit the BIOS after configuration.