To create your own VPN server on a Windows computer, follow these steps:
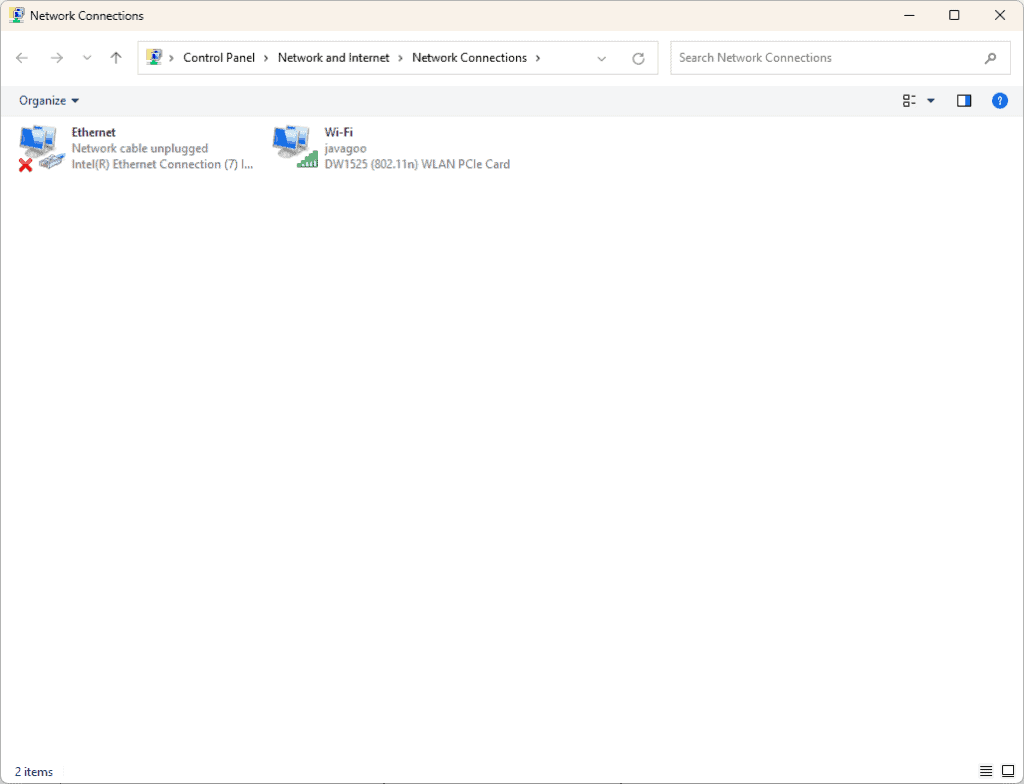
1. Open the Network Connections window by clicking Start and typing “ncpa.cpl,” then selecting the result.
2. Create a new incoming connection.
3. Allow VPN connections through your firewall.
Setting up your own VPN server may seem complicated, but with the right steps, it’s manageable. By following these instructions, you can establish a Virtual Private Network that provides a secure connection and greater privacy on the Internet without relying on third-party services.
Setting Up Your Windows VPN Server
Windows comes with built-in tools to host your own VPN server, offering a simple way to secure your internet connection and access your home network from anywhere. Follow these steps to get started:
1. Enable the Incoming Connections Feature
- Open the “Network Connections” window (search for it in the Start menu).
- Press “Alt + F” and select “New Incoming Connection.”
- Choose the user accounts that can access the VPN.
- Check the “Through the Internet” box and click “Next.”
- Check “Internet Protocol Version 4 (TCP/IPv4)” and click “Allow access.”
- Click “Finish” to complete the setup.
2. Configure the VPN Server Properties
- Right-click the newly created connection and choose “Properties.”
- Switch to the “Networking” tab.
- Select “Internet Protocol Version 4 (TCP/IPv4)” and click “Properties.”
- Click “Specify TCP/IP addresses.”
- Set a static IP address range for connected devices (e.g., 192.168.1.100 to 192.168.1.199).
- Click “OK” to save the changes.
3. Set Up Port Forwarding
- Access your router’s settings page (usually by entering its IP address in a browser).
- Find the port forwarding section.
- Forward the following ports:
- TCP Port 1723: For the PPTP VPN protocol.
- Protocol 47 (GRE): For the Generic Routing Encapsulation protocol used by PPTP.
4. Connect to Your VPN
- On your remote device, go to “Network & Internet Settings.”
- Click “Add a VPN connection.”
- Enter your VPN server’s public IP address (or domain name if you have one) and the username and password you created.
- Connect to the VPN and enjoy a secure connection!
Additional Tips
- Security: Consider using a third-party VPN server software for more advanced security features and protocol options.
- Firewall: Make sure your firewall allows incoming VPN traffic.
- Dynamic DNS: If you have a dynamic IP address, consider using a Dynamic DNS service to easily connect to your VPN.
Troubleshooting
- If you can’t connect, double-check your port forwarding settings and firewall rules.
- Ensure the VPN connection uses the correct protocol (PPTP).
- If you’re still having trouble, consult online resources or forums for help.
Table: Port Forwarding Settings
| Port | Protocol | Description |
|---|---|---|
| 1723 | TCP | PPTP VPN Protocol |
| 47 | GRE | Generic Routing Encapsulation |
Key Takeaways
- Setting up a VPN server on Windows is possible and provides a secure connection.
- Open Network Connections, create an incoming connection, and adjust firewall settings.
- This process increases Internet privacy without using third-party VPN providers.
Setting up a VPN Server on Windows
Setting up a VPN server on Windows involves several key steps. These steps include preparing your device, selecting a VPN protocol, installing and configuring the server, creating user access, testing and troubleshooting, and maintaining the server for optimal performance.
Initial Considerations
Before setting up a VPN server on Windows, consider your needs and the resources available. Ensure you have a computer with a stable internet connection and a working Windows 10 or Windows 11 operating system. Verify that your router and firewall support VPN connections and that your ISP allows VPN traffic.
Choosing the Right VPN Protocol
Select a VPN protocol that matches your security and performance needs. The most common protocols include PPTP, OpenVPN, and WireGuard. OpenVPN and WireGuard offer better security and encryption, while PPTP is easier to set up but less secure. Each protocol uses different ports, so ensure your router is configured to allow the necessary traffic through port forwarding.
Installation and Configuration
To install and configure the VPN server:
- Open the Control Panel on your computer.
- Go to Network and Sharing Center.
- Click on Change adapter settings.
- Press the Alt key to show the full menu.
- Click on File and select New Incoming Connection.
- Choose the users who can connect to the VPN.
- Make sure to configure your firewall to allow VPN traffic.
- Ensure your router’s firmware (like DD-WRT or OpenWRT) supports the VPN protocol you chose.
Creating User Access
Set up user access by creating user accounts with strong passwords. Limit access to trusted users to keep your network secure. Regularly update passwords and review user permissions to prevent unauthorized access.
Steps:
- In the Network Connections window, select Incoming Connections.
- Add or remove users as needed.
- Set permissions and restrictions for different users.
Testing and Troubleshooting
After setting up the VPN server, test the connection to ensure it works properly. Connect from different devices using the same VPN protocol. If you face issues, check the following:
- Router and firewall settings
- Port forwarding configuration
- VPN protocol compatibility
- User account details and permissions
Common issues may include incorrect IP address settings, blocked ports, or mismatched encryption settings.
Maintaining and Monitoring the VPN Server
Keep your VPN server secure and running smoothly by regularly maintaining it. Update the operating system and any VPN software to the latest versions. Monitor the server logs for unusual activity. Regularly review and update user access permissions.
Implement regular security checks:
- Update antivirus software.
- Change passwords periodically.
- Monitor connected devices for any unauthorized access.
Maintaining a VPN server involves continuous vigilance and timely updates to ensure robust security and stable performance.
Frequently Asked Questions
Creating your own VPN server on a Windows platform can ensure privacy and security. This section addresses common questions about setting up and using a VPN server on Windows 10 and Windows 11.
What steps are required to set up a VPN server on Windows 10?
- Open “Settings” and go to “Network & Internet”.
- Select “VPN” and click “Add a VPN connection”.
- Choose “Windows (built-in)” as the VPN provider.
- Enter a name for the connection, the server address, and other necessary details.
- Click “Save” and toggle the connection as needed.
How can I configure a VPN server on Windows 11 using built-in tools?
- Open the “Network Connections” window by typing
ncpa.cplin the search box. - Press the ALT key to show the full menu options.
- Select “File” and then “New Incoming Connection”.
- Choose users who can connect remotely.
- Select “Through the Internet” and then configure the new connection.
Is it possible to use my Windows computer as a VPN server, and if so, how?
Yes, a Windows computer can be used as a VPN server. By using the built-in features in Windows, you can set up a VPN server that others can safely connect to. The steps involve configuring network settings, adding user permissions, and creating a secure connection.
Does Windows provide a built-in VPN server, and how can it be enabled?
Windows has built-in VPN server capabilities. You can enable it through the “Network Connections” settings by creating a new incoming connection, defining who can connect, and setting up through the internet options. This uses existing Windows Pro features without extra software.
What information is needed to establish a VPN connection to a Windows server?
To establish a VPN connection, you need the server address, VPN type, username, password, and any specific settings like protocols or DNS information. Ensure that all details are securely managed to protect the connection.
Can you create a completely free VPN server on a Windows platform?
Yes, it is possible to create a free VPN server on a Windows platform using the built-in features. This does not require additional software and can be set up by configuring the network settings and user privileges properly.


